If you’re experiencing musty odors, high energy bills, or concerns about your home’s air quality, your crawl space might be the culprit. Many homeowners overlook this hidden area beneath their homes, but it plays a critical role in your property’s overall health, efficiency, and value. Crawl space encapsulation has emerged as one of the most effective solutions for protecting your home from moisture damage, improving indoor air quality, and reducing energy costs.
This comprehensive guide will walk you through everything you need to know about crawl space encapsulation before making this important investment in your home.
Understanding Crawl Spaces and Why They Matter
A crawl space is the area located between your home’s floor and the ground below. Unlike full basements, crawl spaces typically vary in height from two feet to around standing height and may consist of a concrete or dirt floor. These spaces provide access to important home systems like plumbing, electrical wiring, and HVAC equipment.
The problem with traditional vented crawl spaces is that they allow outside air, moisture, and pests to enter your home. Up to 50% of the air you breathe indoors can come from crawl spaces within your home. This means that whatever conditions exist in your crawl space—whether it’s mold, moisture, or contaminants—can directly impact your living environment.
What is Crawl Space Encapsulation?
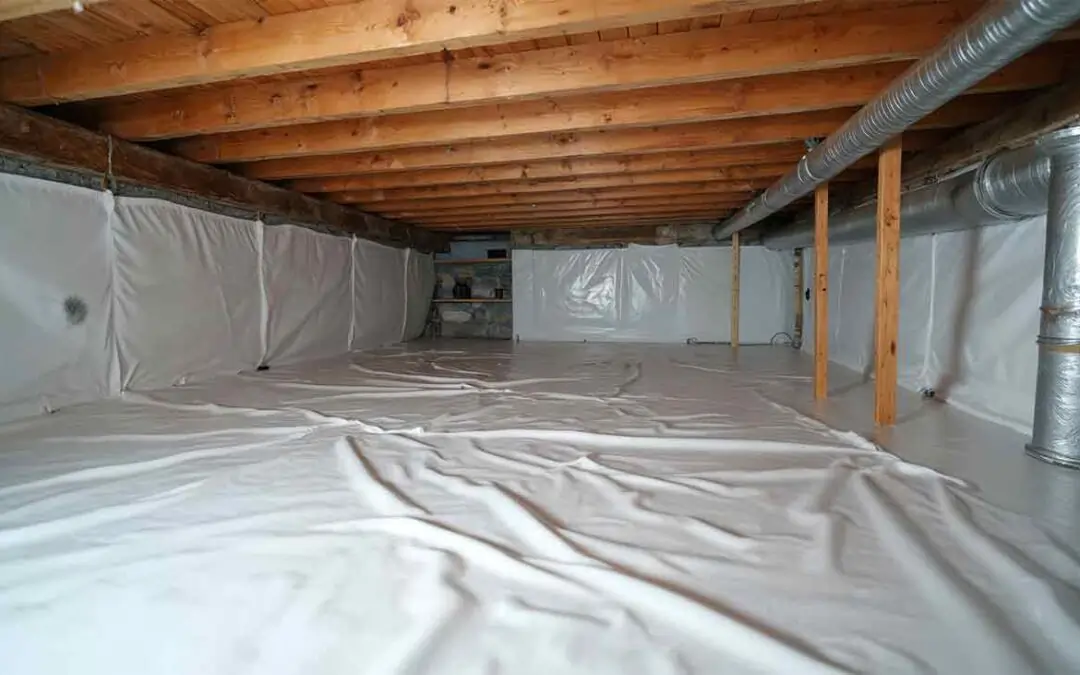
Crawl space encapsulation is the process of lining your crawl space with heavy-duty polyethylene that covers and seals the floors, walls, and, in some cases, the ceiling. This creates a moisture barrier similar to the lining found in swimming pools, effectively separating your home from the ground beneath it.
The encapsulation process goes beyond simply laying down plastic sheeting. It’s a comprehensive approach that transforms your crawl space from a dark, damp area into a clean, controlled environment that protects your home’s structural integrity and improves overall indoor conditions.
How Does Crawl Space Encapsulation Work?
Understanding the encapsulation process helps homeowners appreciate the complexity and value of this investment. Pinnacle Home Services has prepared a detailed breakdown of how professional encapsulation works:
Step 1: Comprehensive Inspection and Assessment
Before any work begins, Pinnacle Home Services will conduct a thorough evaluation of your crawl space. This crawl space and foundation inspection checks for any standing water or mold, looks for cracks and signs of pests, and helps determine if serious issues require professional attention. This assessment identifies existing problems such as water intrusion, structural damage, mold growth, or pest infestations that must be addressed before encapsulation can proceed.
Step 2: Preparation and Remediation
Once the inspection is complete, the real work begins. We remove fallen and damaged insulation, any debris left behind by critters, and torn or damaged vapor barrier. If mold is present, it must be treated and removed. Any standing water needs to be drained, and structural repairs should be completed. This preparation phase ensures a clean, dry foundation for the crawl space encapsulation system.
Step 3: Drainage System Installation
For crawl spaces prone to water intrusion, an interior foundation drainage system, similar to a French drain, diverts water to a sump pump system that moves water away from the home’s foundation. This critical step prevents bulk water problems that could undermine the entire encapsulation system.
Step 4: Vapor Barrier Installation
The heart of the encapsulation process involves installing a heavy-duty vapor barrier. A 20-mil vapor barrier is sealed at all seams, run up the foundation walls 6-8 inches above outside grade, and wrapped and sealed around all piers to prevent moisture from the earth from rising into the crawl space. This thick polyethylene material is far more durable than standard plastic sheeting and is designed to last for decades.
The vapor barrier is mechanically fastened to walls and sealed with specialized adhesives and waterproof tape. Where separate pieces meet, they overlap and are carefully sealed to create a continuous moisture barrier throughout the entire space.
Step 5: Vent and Entry Sealing
All crawl space vents are sealed from the inside, maintaining the exterior aesthetic of your home. This prevents outside air from entering the space, which is essential for controlling humidity and temperature. Access doors are also upgraded to insulated, airtight versions that prevent air infiltration.
Step 6: Insulation Installation
The crawl space walls are insulated with a continuous R-10 of insulation using either foam board insulation or closed-cell spray foam insulation. This step is crucial for energy efficiency, as it prevents heat loss in winter and heat gain in summer. The rim and band joists—where floor joists meet the foundation—are also sealed to stop air and moisture infiltration.
Step 7: Dehumidification System
The final component of a complete encapsulation system is humidity control. Even with all moisture barriers in place, a crawl space dehumidifier may also be installed to help control humidity levels and prevent moisture buildup in the crawl space, keeping it dry and preventing mold growth. The dehumidifier continuously monitors and regulates moisture levels, typically maintaining relative humidity below 60 percent for optimal conditions.
The Science Behind Encapsulation: Why It Works
Crawl space encapsulation works by addressing the fundamental problem of moisture movement and air exchange. Traditional vented crawl spaces were designed on the premise that outside air circulation would prevent moisture buildup. However, this approach actually introduces more problems than it solves, especially in humid climates.
When warm, humid air enters a cool crawl space, condensation forms on cooler surfaces like pipes, ductwork, and wood framing. This constant moisture exposure creates the perfect environment for mold growth and wood rot. By sealing the crawl space and controlling humidity mechanically, encapsulation eliminates this condensation cycle entirely.
Additionally, the “stack effect” in homes causes air to rise from lower levels to upper floors. This means air from your crawl space is constantly being drawn into your living areas. Encapsulating the crawl space helps create a barrier that reduces air leakage, thereby mitigating these issues and enhancing the overall energy efficiency, comfort, and air quality of the home.
Key Benefits of Crawl Space Encapsulation
Understanding the benefits helps homeowners evaluate whether this investment makes sense for their situation. Here are the most significant advantages:
Improved Energy Efficiency
One of the most immediate and measurable benefits is reduced energy costs. Homeowners can save an average of 15% on heating and cooling costs by air sealing their homes and adding insulation in attics, floors over crawl spaces, and accessible basement rim joists. These savings accumulate month after month, helping offset the initial investment over time.
Enhanced Indoor Air Quality
Encapsulation prevents moisture from building up in the crawl space, which prohibits mold growth and stops mold, mildew, and other contaminants from entering your living space. This creates a healthier home environment, particularly beneficial for family members with allergies or respiratory conditions.
Moisture and Mold Prevention
By creating a comprehensive moisture barrier, encapsulation addresses the root cause of mold and mildew problems. This protection extends to your home’s structural components, preventing wood rot and preserving floor joists, beams, and subflooring.
Pest Deterrence
An encapsulated crawl space helps to deter pests such as insects and rodents by eliminating the damp, dark environment they thrive in. While not a complete pest prevention solution, proper encapsulation makes your crawl space significantly less attractive to unwanted visitors.
Structural Protection
Moisture and pests in your crawl space lead to structural damage over time because vapor within the crawl space can rot your home’s wooden frames and flooring. Encapsulation keeps moisture at bay, protecting these critical structural elements and avoiding expensive repairs down the road.
Increased Home Value
Encapsulated crawl spaces can increase home values by an average of 10%. Energy-efficient homes with proper moisture control are increasingly desirable in today’s real estate market. For every $1 reduction in annual energy costs, a home’s value increased by $20-$24, making encapsulation a smart financial decision even if you’re planning to sell.
Additional Usable Space
Once encapsulated, your crawl space becomes a clean, dry area that can be used for storage. Instead of a dirt-floor area you’d never want to enter, you’ll have a functional space that adds practical value to your home.
How Much Does Crawl Space Encapsulation Cost?
Cost is naturally one of the most important considerations for homeowners. Encapsulating a crawl space costs between $1,500 and $20,000, depending on factors such as size, condition, prep work, waterproofing, and maintenance. More specifically, crawl space encapsulation in 2025 costs $5,000–$15,000 on average, or $2–$10 per square foot, depending on size, condition, and materials.
Cost Breakdown
Understanding where your money goes helps you evaluate quotes from different contractors:
- Labor: Labor accounts for between 50% and 70% of the total project cost, typically ranging from $3,000 to $4,200 for standard projects
- Materials: Vapor barriers, insulation, dehumidifiers, and drainage systems comprise the remaining 30-50%
- Permits: Permits cost between $50 and $250, depending on your location
- Repairs and prep work: Pre-existing issues like mold remediation, pest control, or structural repairs add to the base cost
Factors That Influence Cost
Several variables affect your final price:
Size of Crawl Space: Larger areas require more materials and labor, directly increasing costs. A 1,000 square foot crawl space will cost significantly less than a 2,000 square foot space.
Current Condition: Encapsulating crawl spaces in poor condition will cost more as pre-existing issues like water damage, pest infestations, mold growth, or foundation repairs must be addressed before encapsulation.
Drainage Requirements: If your crawl space has standing water or flooding issues, installing drainage systems and sump pumps adds to the overall investment but is essential for long-term success.
Material Quality: Thicker, more durable vapor barriers, high-quality insulation like rigid foam board, and energy-efficient dehumidifiers cost more upfront but provide long-term benefits and value.
Geographic Location: Labor and material costs vary by region, with some areas commanding premium prices for specialized work.
DIY vs. Professional Installation: What You Need to Know
Some homeowners consider tackling encapsulation themselves to save money. While this might seem financially attractive, there are important considerations:
The Reality of DIY Encapsulation
If you make $15/hour and it takes you 40 hours to encapsulate your crawl space that’s $600 plus materials and tools, not to mention time lost with loved ones. Additionally, DIY projects often lack the expertise needed for proper installation, potentially leading to inadequate moisture control and failed systems.
Common DIY mistakes include improper sealing, inadequate drainage, incorrect vapor barrier installation, and insufficient humidity control. These errors can trap moisture rather than eliminate it, potentially creating worse problems than before.
Advantages of Professional Installation by Pinnacle Home Services
Professional contractors bring several critical advantages:
- Expertise and Experience: Professionals understand local building codes, proper techniques, and potential pitfalls
- Quality Materials: Access to commercial-grade materials not available to consumers
- Proper Equipment: Specialized tools and safety equipment for working in confined spaces
- Warranties: Most professional installations include guarantees on both materials and workmanship
- Comprehensive Solutions: Ability to address drainage, structural issues, and complex situations
Professional encapsulation typically lasts 15-20 years or more with proper maintenance, while DIY solutions often require repairs or replacement much sooner.
How Long Does Crawl Space Encapsulation Last?
When properly installed and maintained, crawl space encapsulation can last 15 to 20 years or more, with the vapor barrier typically having a lifespan of 20 to 25 years. Some high-quality systems can even last the lifetime of the home with appropriate care.
Longevity depends on several factors:
- Quality of materials used
- Professional installation vs. DIY
- Local climate conditions
- Presence of proper drainage systems
- Regular maintenance and inspections
Maintenance Requirements After Encapsulation
While encapsulation dramatically reduces crawl space maintenance needs, it’s not a completely set-it-and-forget-it solution. Maintaining a crawl space after encapsulation involves regular inspections of the vapor barrier for damage, checking and servicing dehumidifiers, and ensuring drainage systems function properly.
Recommended maintenance includes:
- Annual visual inspections of the vapor barrier
- Quarterly dehumidifier checks and filter changes
- Monitoring humidity levels
- Clearing drainage systems of debris
- Addressing any tears or punctures promptly
Is Crawl Space Encapsulation Worth It?
For most homeowners, the answer is yes. The combination of energy savings, health benefits, structural protection, and increased home value makes encapsulation a sound investment. Encapsulation is an investment that pays off in comfort and savings by preventing future repairs, preserving your home’s structural integrity, and boosting appeal to potential buyers.
Consider encapsulation especially important if you experience:
- High humidity or moisture in your crawl space
- Musty odors in your home
- High energy bills despite proper HVAC maintenance
- Mold or mildew problems
- Pest infestations
- Sagging or soft floors
- Foundation cracks or concerns
When Encapsulation Might Not Be Suitable
While encapsulation benefits most homes, certain situations require careful consideration:
Unresolved Water Issues: Encapsulations do not prevent water entry or flooding under houses and require installation of a water drainage system that directs water away. Major flooding problems must be resolved first.
Active Gas Appliances: Homes with gas furnaces or water heaters in the crawl space require special attention to prevent carbon monoxide backdrafting.
Severe Structural Damage: Foundation failures or major structural issues should be repaired before considering encapsulation.
Choosing the Right Contractor
Pinnacle Home Services is your Trusted Crawl Space Foundation Specialist:
- Specialize in crawl space and foundation work
- Serving the Sacramento Valley for over a decade
- Provide free, detailed inspections
- Offer transparent pricing with itemized estimates
- Use high-quality, warrantied materials
- Have positive customer reviews and references
- Carry proper licensing and insurance
- Provide written warranties on work performed
Get at least three quotes and compare not just price, but materials, scope of work, and warranty terms.
Special Considerations for Different Climates
Crawl space encapsulation benefits homes in all climates, but approach varies by region:
Humid Climates: Require more robust dehumidification systems and may need more frequent maintenance checks.
Cold Climates: Focus on insulation to prevent frozen pipes and reduce heating costs.
Dry Climates: Even in drier areas, encapsulation reduces drafts and enhances energy efficiency.
Flood-Prone Areas: Require comprehensive drainage solutions including sump pumps and French drains.
Common Misconceptions About Crawl Space Encapsulation
Myth: Crawl spaces need to breathe through vents. Reality: Vented crawl spaces actually introduce more moisture and problems in most climates.
Myth: Encapsulation traps moisture inside. Reality: Proper encapsulation with dehumidification removes moisture; improper DIY installation might trap moisture.
Myth: Any plastic sheeting works for vapor barriers. Reality: Professional-grade reinforced polyethylene is essential for durability and effectiveness.
Myth: Encapsulation isn’t needed in dry climates. Reality: All climates benefit from improved energy efficiency and air quality.
Return on Investment: The Numbers
The financial case for encapsulation becomes clear when examining long-term savings:
Energy Savings: Energy bills can be reduced by 10% to 30% with adequate encapsulation and insulation, resulting in savings of approximately $200 to $600 annually. Over 15 years, this equals $3,000 to $9,000 in savings.
Avoided Repairs: Mold remediation can range from $1,500 to upwards of $5,000, and investing in encapsulation may save on future mold remediation costs and related repairs.
Home Value Increase: With an average 10% value increase, a $300,000 home could gain $30,000 in value—far exceeding the typical encapsulation investment.
Making Your Decision
When evaluating whether crawl space encapsulation is right for your home, consider:
- Current crawl space condition: Schedule a professional crawl space inspection to understand existing issues
- Your timeline: Planning to sell soon or stay long-term affects ROI calculations
- Budget: Explore financing options if upfront costs are a concern
- Climate and location: Some regions see more dramatic benefits than others
- Health concerns: Families with allergies or respiratory issues benefit significantly from improved air quality
Conclusion: Protecting Your Home from the Ground Up
Crawl space encapsulation represents a proactive investment in your home’s health, efficiency, and value. By creating a sealed, controlled environment beneath your living space, you’re addressing problems that many homeowners don’t even realize they have until significant damage occurs.
The combination of reduced energy bills, improved indoor air quality, protection from moisture and structural damage, and increased property value makes encapsulation one of the smartest home improvements available. While the upfront investment may seem substantial, the long-term benefits—both financial and health-related—provide compelling returns for years to come.
If you’re experiencing any signs of crawl space problems or simply want to improve your home’s performance, consulting with Pinnacle Home Services is the first step. A thorough inspection will reveal your specific needs and help you make an informed decision about protecting one of your most valuable assets: your home.
Remember, your crawl space might be out of sight, but it should never be out of mind. Taking action now with proper encapsulation ensures your home remains healthy, efficient, and valuable for decades to come.